
| Latest version | Supported operating systems | Cloud Logging & Notify |
|---|---|---|
| 0.1.8 (nov 2019) |
Raspberry Pi OS 9 (stretch) and 10 (buster) (may also work on other Debian-like systems with systemd) |
Modbus OPC-UA Logger API |
In this article you will be guided through the steps of connecting your Raspberry Pi directly to the CloudVPN Portal using the CloudVPN Agent, without requiring additional hardware in the form of the CloudVPN router, allowing you to remotely access it as if you are on-site.
Prerequisites
- CloudVPN Portal Account
- Raspberry Pi with an active internet connection
Below is a listed overview of the steps.
- Flash your Raspberry Pi
- Download, install, and start the CloudVPN Agent
- Register and activate the CloudVPN Agent
- Update LAN settings
Flash your Raspberry Pi
The Raspberry Pi comes with no operating system by default and leaves customers free to choose which operating system to write to their SD cards. To install the CloudVPN Agent it is necessary to have Debian as the underlying operating system. There is a Debian image available specifically developed for the Raspberry Pi, called Raspberry Pi OS. This gives users a ready to go operating system without going through an installer.
The following steps explain how you flash the SD card, using Balena Etcher. You can find the latest Raspberry Pi OS image here and previous versions here.
- Open Balena Etcher.
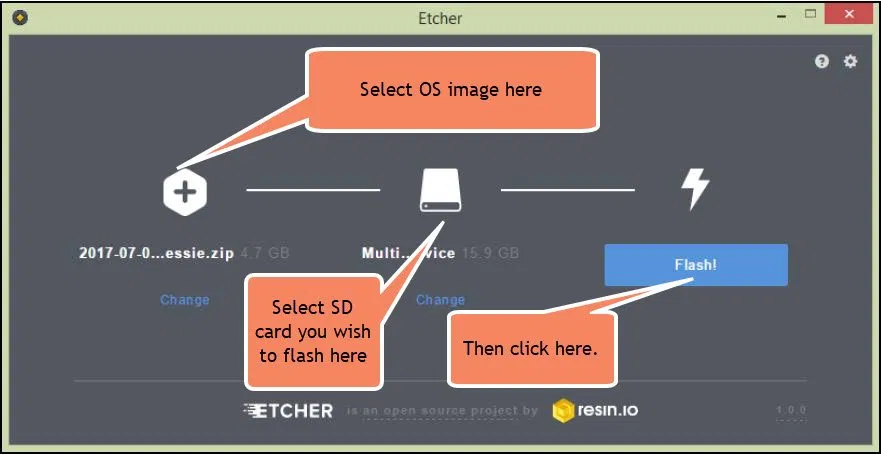
- Select the Raspberry Pi OS image to flash to the SD card.
- Select the SD card to flash to.
- Click on [Flash!].
- Wait for the flashing to finish.
- Once finished, remove the SD card from your computer, insert it into the Raspberry Pi, and turn on the Raspbery Pi.
Download, install, and start the CloudVPN Agent
When you have a Raspberry Pi running one of the supported OS versions, you can proceed to install the CloudVPN Agent. Please contact us and request the Raspberry Pi CloudVPN Agent package.
Updating existing installation?
If you're updating an installation that is already registered on the CloudVPN Portal, you'll have to back up the CloudVPN Agent configuration file, found at: /etc/ixon/ixagent.conf
Place this file back after you've finished the installation. You can then skip the "register and activate"-parts of this article, as your CloudVPN Agent is still registered and activated.- Open the terminal.
- Download the CloudVPN Agent onto the Raspberry Pi.
(replace <downloadlink> with the link you received from us)
wget <downloadlink>
- Unzip the CloudVPN Agent package.
(replace <filename> with the filename)
unzip <filename>
- Install the CloudVPN Agent and its dependencies:
sudo dpkg -i ixagent-0.4.3.deb mosquitto-1.4.10.deb openvpn-2.4.5.deb
- Enable the CloudVPN Agent:
sudo systemctl enable ixagent
- Start the CloudVPN Agent:
sudo systemctl start ixagent
Register and activate the CloudVPN Agent
You need to know your company ID, which you can find on the same page as where you can change your company details, before you can proceed to register your CloudVPN Agent.
- Open the terminal on the Raspberry Pi.
- Register the CloudVPN Agent to the CloudVPN Portal.
(replace <your_company_ID> with your company ID)
ixagent-register.sh <your_company_ID>
The CloudVPN Agent will now register the device to the CloudVPN Portal and will automatically set up a secure VPN connection. You now have to activate the newly registered CloudVPN Agent in the CloudVPN Portal.
- Go to the CloudVPN Portal Fleet Manager app, which is accessible from the Apps menu
 in the top right corner if you are currently in a different CloudVPN Portal app.
 - Open the main menu
 and go to Devices
  .
.
You will find a yellow bar at the top of your devices list, saying "New device". This yellow bar also shows up in the CloudVPN Portal Portal app.
- Click the yellow bar, name your device as you see fit, enter the license code you received with your purchase, and click [Activate].
Update LAN settings
Lastly, we advise you to update the CloudVPN Agent's online LAN settings to match the local IP address of the Raspberry Pi. This will enable you to remotely connect to your Raspberry Pi using its local IP address.
- Go to the CloudVPN Portal Fleet Manager app, which is accessible from the Apps menu in the top right corner if you are currently in a different CloudVPN Portal app.
- Open the main menu , go to Devices , and select the concerning device.
- Expand the Network
 options and go to [LAN].
 - Enter the local IP address and network mask of the Raspberry Pi and click [Confirm changes]. There is no need to push these settings.
CloudVPN Agent is activated
Your device is now successfully registered, activated, and configured in the CloudVPN Portal. You can now connect to your device using VPN, add VNC or HTTP services, add Cloud Logging or Cloud Notify, and add it to groups to determine who can access it.
Comments
0 comments
Article is closed for comments.