
Supported hardware and firmware
The CloudVPN router's local web interface is available on the CloudVPN router3 in firmware 3.19 and up. Please upgrade your firmware if you are running an older version.
This article addresses the CloudVPN router's local web interface, which enables you to register the CloudVPN router if it is not yet registered in the CloudVPN Portal, change the CloudVPN router's WAN, LAN, and Firewall configuration locally, or view the CloudVPN router's status overview, a more advanced alternative to the LED statusses. For additional troubleshooting help, please view: Troubleshooting - unable to connect your CloudVPN router to the CloudVPN Portal.
Select what you would like to do:
- Overview - View the CloudVPN router's status overview
- Configuration - Register the CloudVPN router
- Configuration - View or change the CloudVPN router's configuration
- Diagnostics - Troubleshoot the CloudVPN router's network connection
Overview - View the CloudVPN router's status overview
The "Overview" page gives information about the CloudVPN router's current status and it may help you to better understand the current situation or troubleshoot any problems.
Open the local web interface
Follow the steps below to open the CloudVPN router's local web interface.
- Connect your computer to one of the CloudVPN router's LAN ports using an Ethernet cable. If you want to connect remotely, establish a VPN connection instead.
- Open a new tab in your browser.
- Enter http://IXrouter3.lan and press [Enter]. If you are connected remotely, enter the CloudVPN router's LAN IP address instead (default 192.168.27.1).
- Go to [Overview].
Status overview details
- System
- Agent - Status
- Agent - Information
- DHCP Leases
- Network - LAN - Ethernet
- Network - LAN - Wi-Fi
- Network - WAN - Ethernet
- Network - WAN - Wi-Fi
- Network - WAN - Cellular
|
System
|
|
| Date | The current time on the CloudVPN router in UTC. |
|
Agent - Status
|
|
| Shows status information about the CloudVPN router's connection to the CloudVPN Portal. | |
| CloudVPN Portal | Whether the CloudVPN router is registered in the CloudVPN Portal or not. |
| VPN / Configuration / Data logging | Connection status to the CloudVPN Portal. For background information, look here. |
|
Agent - Information
|
|
| Shows additional information. |
|
| Company ID | The CloudVPN Portal company ID where this CloudVPN router is currently registered. |
| Company Name | The CloudVPN Portal company name where this CloudVPN router is currently registered. |
| VPN server | The VPN server that the CloudVPN router is currently connected to. For example, am06.rsv.ayayot.com (phonetic IIoT) is one of our VPN servers in Amsterdam. |
|
DHCP Leases
|
|
| Shows all active LAN DHCP leases. Not all mentioned devices may still be connected. | |
| IP Address | The IP address of the connected device. |
| MAC Address | The MAC address of the connected device. |
| Hostname | The hostname of the connected device. |
| Expires | The time, in seconds, when the DHCP lease expires. If the connected hardware is still connected, it will automatically ask for a renewal. If it is no longer connected, the IP address becomes available again. |
|
Network - LAN - Ethernet
|
|
| Shows information about the wired LAN. | |
| MAC address | The MAC Address of the CloudVPN router. |
| Protocol | This will always be "static". |
| IP address | The LAN IP address of the CloudVPN router. |
| Mask | The LAN subnet mask of the CloudVPN router. |
|
Network - LAN - Wi-Fi
|
|
| Shows information about the LAN Wi-Fi hotspot. The password is not shown for security reasons. |
|
| SSID | The network name of the LAN Wi-Fi hotspot (max. 32 characters). |
| Encryption | The Wi-Fi encryption level. Cannot be changed. |
| Channel | The selected Wi-Fi channel. |
|
Network - WAN - Ethernet
|
|
| Shows information about the wired WAN connection. |
|
| MAC address | The MAC Address of the CloudVPN router. |
| Protocol | Whether the IP address is manually configured (static) or obtained automatically (DHCP). |
| IP address | The WAN IP address of the CloudVPN router. |
| Mask | The WAN subnet mask of the CloudVPN router. |
| DNS server | The DNS server IP address used by the CloudVPN router. |
|
Network - WAN - Wi-Fi
|
|
| Shows information about the Wi-Fi WAN connection. |
|
| SSID | The network name of the WAN Wi-Fi network that the CloudVPN router is connected to. |
| Quality | The signal quality of the WAN Wi-Fi connection. |
| Protocol | Whether the IP address is manually configured (static) or obtained automatically (DHCP). |
| IP address | The WAN IP address of the CloudVPN router. |
| Mask | The WAN subnet mask of the CloudVPN router. |
| DNS server | The DNS server IP address used by the CloudVPN router. |
| DNS search domain | The DNS search domain. |
|
Network - WAN - Cellular
|
|
| Shows information about the cellular WAN connection. |
|
| APN | The currently configured APN (Access Point Name). |
| Status | The cellular connection status. |
| Network - WAN - Cellular - SIM | |
| State | Whether the CloudVPN router detects a SIM card or not and whether it's unlocked with the configured PIN (SIM ready). |
| Network - WAN - Cellular - Network | |
| Roaming | Whether the SIM card supports roaming. |
| Registration | Whether the CloudVPN router is able to register itself onto the cellular network. This is necessary for the CloudVPN router to get internet access. |
| Network - WAN - Cellular - Signal | |
| Type | The type of connection. GSM = 2G (unsuitable for data transmission) UMTS, (W)CDMA = 3G LTE = 4G |
| Quality | The signal quality of the WAN cellular connection. |
| RSSI | The RSSI (Received Signal Strength Indicator) indicates how well the CloudVPN router receives signals from the cellular tower. -30 dBm = Very good -67 dBm = Good -70 dBm = OK -80 dBm = Not Good -90 dBm = Unusable |
Easy remote access
In addition to the steps mentioned earlier, you can also create an HTTP service, but leave the "IP address"-field empty, for an easy way to open and view the CloudVPN router's status overview remotely.
Configuration - Register the CloudVPN router
If your CloudVPN router is not yet registered in the CloudVPN Portal, you can register it using a configuration file and USB flash drive, or you can register it from the CloudVPN router's local web interface, which is explained below.
- Open the local web interface
- Configure the CloudVPN router
- Register the CloudVPN router
- Activate the CloudVPN router
Open the local web interface
Follow the steps below to open the CloudVPN router's local web interface.
- Connect your computer to one of the CloudVPN router's LAN ports using an Ethernet cable.
- Open a new tab in your browser.
- Enter http://CloudVPN router3.lan and press [Enter]. Alternatively, you can enter the CloudVPN router's LAN IP address instead (default 192.168.27.1).
- Go to [Configuration] and enter the password listed on the side of the CloudVPN router. If there is no password listed, you're unable to use this method to register the CloudVPN router. Use a configuration file instead.
Change password
You can change the password by going to [Account] in the bottom left corner.Configure the CloudVPN router
You'll first need to configure the CloudVPN router's network settings.
- Go to "Network - WAN" on the local web interface, configure a connection type that the CloudVPN router will use to connect to the CloudVPN Portal (details below).
Ethernet The CloudVPN router's current wired WAN configuration. Letting the CloudVPN router obtain an IP address automatically will be suitable for most situations (Connection type: DHCP). If you choose to enter a static IP address instead (Connection type: static), be sure to always consult the local IT administrator for the correct network settings (IP address, network mask, default gateway, and DNS server).
The CloudVPN router's WAN IP range (company network, e.g. 192.168.100) needs to be different from its LAN IP range (machine network). Background information can be found here.Wi-Fi The CloudVPN router's current Wi-Fi WAN configuration. Enter the name (SSID) of the wireless network with the correct capitalization ("guestwifi" is a different network than "GuestWiFi"). If it's password protected you'll also need enter the network's password. If you are unsure about the details, or the requirements mentioned below, please consult the local IT administrator.
Letting the CloudVPN router obtain an IP address automatically will be suitable for most situations (Connection type: DHCP). If you choose to enter a static IP address instead (Connection type: static ; requires firmware 3.22 or higher), be sure to always consult the local IT administrator for the correct network settings (IP address, network mask, default gateway, and DNS server).
The CloudVPN router can't connect to a Wi-Fi network if it requires you to log in to a webpage or accept their terms of use first.
The CloudVPN router can only connect to 2.4GHz networks and only if they are on channels 1 - 11.
Special characters can be used for the SSID. But it cannot end with a space.
The CloudVPN router's WAN IP range (company network, e.g. 192.168.100) needs to be different from its LAN IP range (machine network). Background information can be found here.
Cellular The CloudVPN router's current cellular WAN configuration. Enter the provider's APN (Access Point Name) and the SIM card's PIN code. Leave the PIN field empty only if there is no PIN set on the SIM card. If required by the provider, also enter the username and password (requires firmware 3.22 or higher). If you are unsure about the details, or the requirements mentioned below, please consult the cellular provider.
Make sure the SIM card is activated and has data available.
Insert the mini SIM card (2FF) before you power on the CloudVPN router.
The 4G/LTE models have 2 SMA connectors for your cellular antenna. The one closest to the power connector is the MAIN and the other connector is the DIV. Always connect an antenna to the MAIN. Connecting an antenna to the DIV is optional and never required. Background information can be found here. - Go to "Network - LAN" on the local web interface, enter an IP address and subnet mask (details below).
IP address The CloudVPN router's LAN (machine network) IP address. Enter a unique IP address, different from the machine or other connected hardware to prevent an IP conflict. Note that this IP address does need to be in the same range as the machine. Mask The CloudVPN router's LAN subnet mask. Enter the same subnet mask as is configured on the machine.
Register the CloudVPN router
Once you have configured the CloudVPN router's WAN and LAN, you can register the CloudVPN router.
- Go to "CloudVPN Portal" on the local web interface, enter the CloudVPN Portal company ID where you want to register this CloudVPN router (details below).
Company ID You can find your company ID in the CloudVPN Portal by opening the account menu in the top right corner.
- Click [Apply].
Activate the CloudVPN router
After a successful registration of your CloudVPN router, you can activate your CloudVPN router, making it ready for remote access.
- Go to the CloudVPN Portal Fleet Manager app, which is accessible from the Apps menu
 in the top right corner if you are currently in a different CloudVPN Portal app.
 - Open the main menu
 and go to Devices
  .
. - You should see a "New device" at the top of your list. Verify that it is the correct CloudVPN router by comparing the serial number with the one listed on the side of the CloudVPN router.
- Click the "New device", give it a name, and click [Activate].
Next step
The CloudVPN router is now set up and ready to be remotely accessed.Configuration - View or change the CloudVPN router's configuration
On the "Configuration" page you can change the CloudVPN router's WAN, LAN, and Firewall settings locally without needing to do this in the CloudVPN Portal or through a configuration file.
- Open the local web interface
- Change the configuration
- Configuration details
- Import the lastest changes into the CloudVPN Portal
Open the local web interface
Follow the steps below to open the CloudVPN router's local web interface.
- Connect your computer to one of the CloudVPN router's LAN ports using an Ethernet cable.
- Open a new tab in your browser.
- Enter http://IXrouter3.lan and press [Enter]. Alternatively, you can enter the CloudVPN router's LAN IP address instead (default 192.168.27.1).
- Go to [Configuration] and enter the password listed on the side of the CloudVPN router. If there is no password listed, contact us to set one for you.
Change password
You can change the password by going to [Account] in the bottom left corner.Change the configuration
Making changes locally in the CloudVPN router does not update the online configuration in the CloudVPN Portal. Import the latest local configuration into the CloudVPN Portal after making any changes, to make sure everything is in sync.
- Make changes in the CloudVPN router's configuration (details below) and click [Apply].
Don't forget to import!
Don't forget to import the latest local configuration into the CloudVPN Portal after making any changes, to make sure everything is in sync. This step is explained after the table below.Configuration details
Click on one of the options below for easy navigation or simply scroll through the table to view a description and relevant tips for every configuration option.
|
CloudVPN Portal
|
|||||||||||
| Company ID | The CloudVPN Portal company ID where this CloudVPN router is currently registered. You can transfer your CloudVPN router to another company in the CloudVPN Portal, if needed. |
||||||||||
|
Network - WAN
|
|||||||||||
| The CloudVPN router's current WAN configuration. | |||||||||||
| Ethernet | The CloudVPN router's current wired WAN configuration. Letting the CloudVPN router obtain an IP address automatically will be suitable for most situations (Connection type: DHCP). If you choose to enter a static IP address instead (Connection type: static), be sure to always consult the local IT administrator for the correct network settings (IP address, network mask, default gateway, and DNS server). The CloudVPN router's WAN IP range (company network, e.g. 192.168.100) needs to be different from its LAN IP range (machine network). Background information can be found here. |
||||||||||
| Wi-Fi |
The CloudVPN router's current Wi-Fi WAN configuration. Enter the name (SSID) of the wireless network with the correct capitalization ("guestwifi" is a different network than "GuestWiFi"). If it's password protected you'll also need enter the network's password. If you are unsure about the details, or the requirements mentioned below, please consult the local IT administrator. Letting the CloudVPN router obtain an IP address automatically will be suitable for most situations (Connection type: DHCP). If you choose to enter a static IP address instead (Connection type: static), be sure to always consult the local IT administrator for the correct network settings (IP address, network mask, default gateway, and DNS server). The CloudVPN router can't connect to a Wi-Fi network if it requires you to log in to a webpage or accept their terms of use first.The CloudVPN router can only connect to 2.4GHz networks and only if they are on channels 1 - 11. Special characters can be used for the SSID. But it cannot end with a space. The CloudVPN router's WAN IP range (company network, e.g. 192.168.100) needs to be different from its LAN IP range (machine network). Background information can be found here. The wireless network password is not stored in the CloudVPN Portal. Therefore you have to send the changes directly to the CloudVPN router by pressing "confirm and push". |
||||||||||
| Cellular | The CloudVPN router's current cellular WAN configuration. Enter the provider's APN (Access Point Name) and the SIM card's PIN code. Leave the PIN field empty only if there is no PIN set on the SIM card. If you are unsure about the details, or the requirements mentioned below, please consult the cellular provider. Make sure the SIM card is activated and has data available. Insert 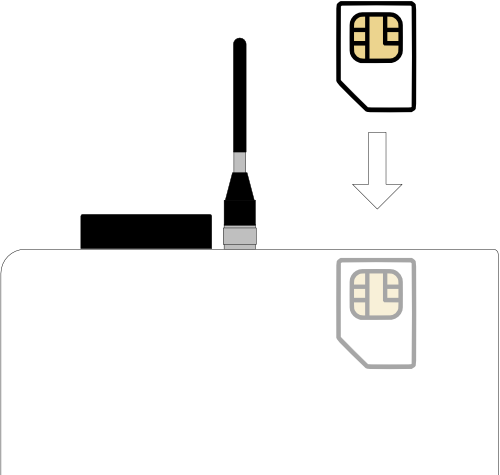 the mini SIM card (2FF) the mini SIM card (2FF) 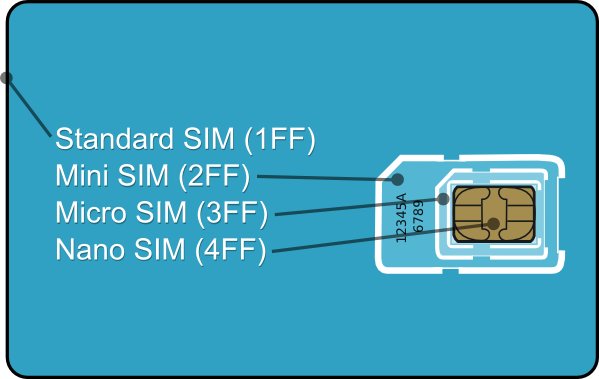 before you power on the CloudVPN router. before you power on the CloudVPN router.The 4G/LTE models have 2 SMA connectors for your cellular antenna. The one closest to the power connector is the MAIN and the other connector is the DIV. Always connect an antenna to the MAIN. Connecting an antenna to the DIV is optional and never required. Background information can be found here. |
||||||||||
|
Network - LAN
|
|||||||||||
| The CloudVPN router's current LAN configuration. | |||||||||||
| Ethernet |
IP address: The CloudVPN router's LAN (machine network) IP address. Enter a unique IP address, different from the machine or other connected hardware to prevent an IP conflict. Note that this IP address does need to be in the same range as the machine. Mask: The CloudVPN router's LAN subnet mask. Enter the same subnet mask as is configured on the machine. |
||||||||||
| Wi-Fi hotspot | Enter a network name (SSID), password, and a preferred channel for the Wi-Fi hotspot. | ||||||||||
| DHCP |
Dynamic IP range: The CloudVPN router's own DHCP server that automatically assigns an IP address from the dynamic IP range (e.g. 192.168.140.200 - 192.168.140.250), and other necessary network parameters, to clients connected to the CloudVPN router's LAN ports if they do not have a static IP address configured. It is advised to choose a range that doesn't conflict with the static IP addresses of connected hardware, like PLCs and HMIs. Static IP leases: Generally, you configure your machine with a static IP address to ensure that you can always access that machine at a specific IP address. Saving you time that you would otherwise have to spend searching for the IP address or trying out different addresses. Especially valuable in time-sensitive situations. In situations where your machines are set to automatically request an IP address you are never sure about their IP address, as it can be different the next day. Whenever such a machine requests an IP address, it receives a lease for a random IP address. When you add an address reservationion to the DHCP server, that machine will always receive a lease for the same IP address, ensuring that you can always access that machine at a specific IP address. |
||||||||||
|
Internet failover
|
|||||||||||
| Settings relevant when multiple WAN connection types have been configured. Only available on CloudVPN router models supporting different connection types. |
|||||||||||
| Priority | The CloudVPN router constantly checks each configured connection to determine whether the connection is available or not. This is done by sending a keep alive message to a public IP address every couple of seconds. This keep alive message needs to fail several consecutive times for the connection to be considered unavailable. The same goes for it to be considered available again. When the preferred connection is unavailable, the CloudVPN router will automatically switch to its 1st fallback connection. When the 1st fallback connection is unavailable as well, the 2nd fallback connection will be used. When a higher priority connection is back up, the CloudVPN router will automatically switch back to that connection. |
||||||||||
| Tracking | The tracking settings are used to check if the connection is available or not. We recommend leaving the default values untouched for the best results. | ||||||||||
|
Firewall
|
|||||||||||
| The CloudVPN router's firewall separates its WAN (corporate network) from its LAN (machine network). |
|||||||||||
| Source NAT | Source NAT is the translation of the source IP address of a packet leaving the router. When enabled, there's no need to set up a default gateway in the machine. Source NAT is enabled by default. If you turn it off, make sure you have configured the machine correctly to maintain remote accessibility. You'll need to enter the CloudVPN router's LAN IP address as the machine's default gateway. |
||||||||||
| LAN |
You can allow access to the internet, for example when you are on-site and need to look up manuals or a PLC needs to send e-mails. You can also allow access to the corporate network, for example when a PLC needs to store data on a local FTP server. The LAN to WAN allow list (requires firmware 3.22 or higher) enables you to allow configured devices on the LAN of the CloudVPN router limited access to both the corporate network and the internet. Allow access to corporate network: All incoming LAN traffic with the corporate network as destination (i.e. any private IP address other than the CloudVPN router's LAN) will be allowed through the firewall. Allow access to internet: All incoming LAN traffic with the internet as destination (i.e. any public IP address) will be allowed through the firewall. LAN to WAN allow list: Allow configured devices on the LAN of the CloudVPN router limited access to both the corporate network and the internet. Add an entry for every device, protocol, or port you want to allow access to both the corporate network and the internet. A source (source IP / MAC) or destination (port) is required.
Please note that if either of the other settings are active (Allow access to corporate network / internet), they overrule the LAN to WAN allow list. |
||||||||||
| WAN |
With a port forwarding you can access the machine, from inside the local corporate network, without having to establish a VPN connection first. How it works: when you are inside the local corporate network, you access the CloudVPN router's WAN IP address at a specific network port (e.g. 5900 for VNC traffic). The CloudVPN router's port forwarding will then forward the network traffic to a target IP address and network port, resulting in a connection with the target (PLC, HMI, or other). It is recommended to set a static WAN IP address for your CloudVPN router to maintain long-term accessibility. Consult the local IT administrator for the correct network settings. Port forwarding has no effect on the VPN connection. External port: All incoming network traffic at this port (at CloudVPN router's WAN) will be forwarded. The port number is application dependent. For example, VNC applications use port 5900 by default. Search online or contact the manufacturer for the correct port number. Target IP address: The IP address to which the traffic needs to be forwarded. Target port: The port number to which the traffic needs to be forwarded. Often the same as the "External port". |
||||||||||
|
Internet proxy
|
|||||||||||
| Necessary only when the internet connection passes through a proxy server (uncommon). |
|||||||||||
| - | If the internet connection passes through a proxy server, you'll have to configure the CloudVPN router to connect via that proxy server as well, otherwise it won't be able to connect to the CloudVPN Portal. The local IT department will know if this is the case and can provide you with the necessary information. | ||||||||||
Import the latest changes into the CloudVPN Portal
After making the changes you wanted, import the latest local configuration into the CloudVPN Portal to make sure everything is in sync.
- Go to the CloudVPN Portal Fleet Manager app, which is accessible from the Apps menu in the top right corner if you are currently in a different CloudVPN Portal app.
- Open the main menu , go to Devices , and select the concerning device.
- Expand More options
 in the top right corner and click [Import config from device].
Configuration changed
The CloudVPN router's configuration has now been changed and the online configuration has been updated.Diagnostics - Troubleshoot the CloudVPN router's network connection
The Diagnostics page gives advanced users tools to troubleshoot the CloudVPN router's network connection. Available in CloudVPN router3 models running firmware 3.22 or higher.
Open the CloudVPN router's diagnostics page
Follow the steps below to open the CloudVPN router's local web interface.
- Connect your computer to one of the CloudVPN router's LAN ports using an Ethernet cable. If you want to connect remotely, establish a VPN connection instead.
- Open a new tab in your browser and go to http://IXrouter3.lan or enter the CloudVPN router's LAN IP address instead (default 192.168.27.1).
- Go to Diagnostics and enter the password listed on the side of the CloudVPN router. If there is no password listed, contact us to set one for you.
Troubleshooting tools
Some networking knowledge is required to effectively use the tools provided.
| Tool | Description |
|---|---|
| ping | Basic connectivity test. |
| traceroute | If the ping fails, test at which network node the connection fails. |
| nslookup | DNS test. |
| route | Prints the CloudVPN router's current routing table. |
| ifconfig |
Prints the CloudVPN router's current network interfaces. Overview below. br-lan = LAN Wired |
Comments
0 comments
Article is closed for comments.